{12} Pignoli

We’ve made it to the end of another instalment of the 12 Days of Baking! This cycle has gone on a little longer than I planned and well into the New Year, but I’d rather that than pile on the stress of trying to do everything by Christmas Eve. Also, spreading things out gives friends and family a sporting chance of being able to enjoy what I bake, rather than turning it into an endurance event whereby cookies need to be eaten as fast as they are made…

To bring things to a conclusion, we’re finishing with a classic Italian cookie: pignoli.

These morsels are delicious almond cookies, crisp and lightly golden on the outside and with a soft and chewy centre. They are generously coated in pine nuts which toast lightly in the oven. They are simultaneously simple and luxurious. I love their festive appearance which will look good on any cookie tray, but they are equally at home any time of the year with a cup of good coffee for a quiet moment of reflection.


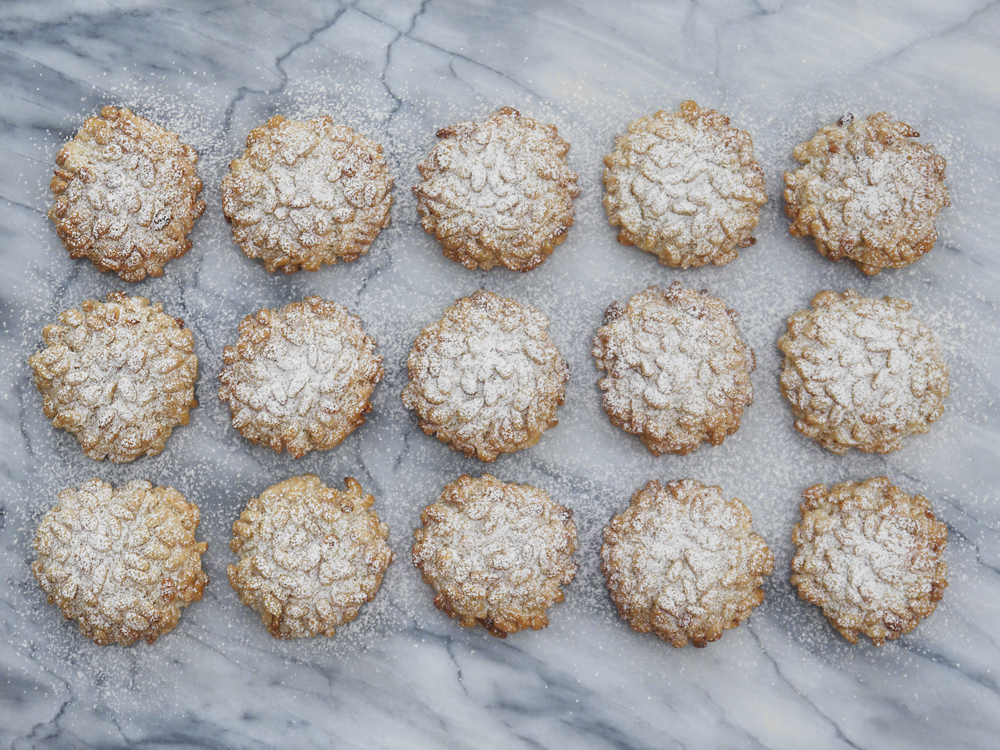
Pignoli originate from the island of Sicily in Southern Italy, where both almonds and pine nuts feature in local cookies. They’ve also made their way to the US, where there are also a favourite in Italian-American families at Christmas.

While my festive baking this year has included some complex bakes, pignoli are (comparatively) easy. One bowl, no resting, no chilling, just roll, coat in nuts and bake. And this is a delightful recipe as it gives you a lot of deliciousness for minimal effort.

When it comes to pignoli recipes, many are based on almond paste, which is mixed with sugar and egg whites. Almond paste is a 50/50 mixture of almonds and sugar, and not the same thing as marzipan here in Britain (marzipan here is typically 25/75 almonds to sugar). However, almond paste is not an ingredient that is easily available in stores here, so I’ve come up with an easy recipe that just uses ground almonds and sugar. It gets us to the same place, and I think it is easier – there is no need to break down a lump of almond paste into a smooth mixture.  Essentially I’m offering a route that involves less work, getting you more quickly to delicious pignoli.


However, even if there is less work involved, we need to be honest. These are clearly luxury cookies. A good amount of almonds, and then lots and lots of pine nuts. This is not a cheap recipe, but hey, they are called pignoli and so pine nuts should be used generously. And you want them to taste of something. I tipped two large bags of pine nuts into a bowl for coating the cookies and assumed I had over-calculated. The rest could be toasted and sprinkled into a salad perhaps? But no. I think I ended up with about a dozen pine nuts left in the bowl at the end. So just a word of warning – get those nuts in, and don’t think you’ll be able to wing it with that half-used bag lurking in the baking cupboard.

If you want to play around with the flavours you can add lemon or orange zest, and they would still be pignoli. Or you could skip the pine nuts and use other nuts to coat the cookies – flaked almonds, or chopped hazelnuts, pistachios or cashews would all work – except that you’re then not making pignoli. They’ll still taste great, but they will be something else. This is, of course, a good way to make a batch of visually different cookies using one basic recipe (or if you ignored my warning and ran short of pine nuts…).

One final point worth knowing – there is no flour, butter or milk in pignoli so these little guys just happen to be naturally gluten and lactose-free. This makes them a great choice if you want to impress and you know someone who needs to avoid either in their diet.

To make Pignoli (makes around 20):

For the dough

• 2 large egg whites
• 175g ground almonds
• 100g icing sugar
• 100g granulated sugar
• 1/2 teaspoon almond extract

To decorate

• 200g pine nuts
• icing sugar

1. Preheat the oven to 175°C (345°F) and line a baking sheet with greaseproof paper.

2. In a large bowl, briefly whisk the egg whites until foamy. Add the rest of the dough ingredients and mix to a smooth dough. It should be sticky but you should be able to form it into balls. If too dry, add a little water. If too sticky, add a teaspoon each of ground almonds, granulated sugar and icing sugar and mix well.

3. Take a teaspoon of the dough (around 25g) and form into a ball. Roll in the pine nuts. Transfer to the baking sheet. Leave around 5cm between each cookie, and keep going until all the dough is used up.

4. Lightly press each cookie to flatten slightly, then bake for 15 minutes (turn the tray around half-way to get an even colour). When baked, remove from the oven, allow to cool on the tray. Lightly dust with icing sugar before serving.

3 Comments

Filed under Christmas, Recipe, Sweet Things

{11} Bauernbrötchen

We’ve already had one culinary jaunt to Austria this year with our pumpkin seed crescent cookies, and we’re going back for our penultimate recipe: Bauernbrötchen which translates as “farmers rolls”. But plain and rustic little breads these certainly are not!


At first glance, these seem to be chocolate crinkle cookies. They look like they contain chocolate, they are white and have that distinctive cracked appearance. Have I just made some of those and called them Austrian?

Of course not! But maybe these are their ancestors from the old country? I did look to see if I could find out more about how these cookies got their name, but drew a blank. My first guess was that it is something to do with the fact they use a lot of nuts, and that nuts were prevalent on farms. Of course this theory fall down quickly – the recipe uses a lot of chocolate, which is historically a luxury ingredient. My second guess, which seems more likely, is that they have more than a passing resemblance to large loaves of Austrian rye bread which is coated in flour with decorative cuts. Which theory do you think is right? It’s got the be the second, right?

Anyway, the method and ingredients  for making these is very different from crinkle cookies. They are made mostly with ground nuts and grated dark chocolate, with just a little flour to hold everything together. So in my book, that makes them even better than crinkle cookies. They are rich but also substantial and taste very, very festive. They also skip spices or citrus flavours, so provide something different on a holiday cookie plate too. I also really like the random cracked appearance which is a real contrast to perfectly identical cookies.


For the nuts, I have used walnuts. These seem to be common in many recipes, and in my mind this is also a very Austrian ingredient. It features in Austrian baking, but there is also a giant walnut tree growing in the garden of the parents of an Austrian friend down near the Slovenian border. So in my head, they make a lot of stuff with walnuts there, and that was what I would do.

However, you can make some adjustments if you want (or depending on what you have to hand). Almonds, hazelnuts, cashews or pecans would all make fine substitutes, either on their own or in combination. I would steer clear of pistachios and pine nuts simply because their flavour would vanish in these cookies and they are are at the pricier end of the nut world.

There are also recipes (including on the Dr Oetker website) which use coconut. If you’re a coconut fan then I am sure this would work, but you may wish to use a mixture of coconut flour and coconut flakes as I can see the recipe remaining too moist otherwise. I’ve had past experience using using coconut flakes when I should have been using coconut flour. So take this with a warning that I have not tested this – if you want to have a go with coconut, do let me know how it works out.

You will see that some of the cookies have a lovely white appearance, while others are more mottled. This was due to oil from the nuts and chocolate coming to the surface during baking. It does not affect the taste in any way, but the easy way to fix this is double rolling. When you shape the cookies, you roll them into a ball, then roll them in icing sugar. Fill the whole tray, then roll each one again in icing sugar. This created a slightly thicker coating, and gives you that picture-perfect crinkle look.


I was pleased with how these turned out – they are pretty easy to make, and the only pain was grating the dark chocolate. With hindsight I might have done this in a food processor. I did it by hand, and chocolate on a grater goes crazy. It creates lots of static, with small pieces of chocolate flying everywhere. I’m not sure there is really anything you can to prevent this, but it is just useful to know so that you’re not wearing your best white clothes as you do this, and at least you are prepared for the mess. Good luck!

And finally, the taste test. The flavour is really good – in spite of containing a fair amount of sugar and chocolate, they are not particularly sweet. The flavour is delicious, rich and nutty. The combination of lots of walnuts with chocolate gives them what I think of as a very “central European flavour”. They also keep very well when stored in a tin. Indeed, I think they actually improve over a couple of days, which is helpful when the recipe makes 50!

To make Bauernbrötchen (makes around 50)

For the dough

• 3 medium eggs, separated
• 1 teaspoon vanilla
• 150g white caster sugar
• 250g ground nuts (traditionally walnuts)
• 160g grated dark chocolate
• 60g plain flour

To decorate

• icing sugar

1. Put the egg yolks, sugar and vanilla into a large bowl. Whisk until light and thick (around 3-4 minutes).

2. Fold in the ground nuts and grated chocolate. The mixture will seem very thick and dry.

3. In a separate bowl, beat the egg whites until you reach soft peaks. Vigorously mix the egg whites into the main mixture until evenly combined. Finally stir in the flour – the mixture should be soft and slightly sticky. Cover and leave to rest overnight.

4. The next day, preheat the oven to 175°C (345°F) and line a baking sheet with greaseproof paper.

5. Take generous teaspoons of the mixture (around 25g) and form into a ball. Roll in the icing sugar, then transfer to the baking sheet. Repeat until the tray is filled, leaving 5cm between each cookie to allow for spreading. At this point, you can re-roll each ball in icing sugar to get a good, even, thick coating.

6. Bake the cookies for 14 minutes, turning the tray half-way to get an even bake. Remove from the oven, allow to cool for a moment (they are very soft when hot), then transfer to a cooking rack.

Leave a comment

Filed under Christmas, Recipe, Sweet Things

{10} Struvor

When I made my Slovak ginger cookies I boasted proudly that I had not bought a special cutter to make them. This was not due to some new-found restraint on my part, but because I had already bought my novelty baking item for the year. That item was a rosette iron, which is used to make light, crisp, fried cookies in intricate patterns.


In English these are called rosette cookies and are popular in parts of the US with Scandinavian heritage. They appear with similar fancy patterns in Norway and Denmark, and as funnel cakes in Finland, but I’ve gone with the Swedish name struvor as I’ve lived in Sweden, and have used the recipe from Johanna Kindvall at Kokblog as my inspiration this year.


I must admit making fried cookies is a style of baking I’m not familiar with. I’m all for enjoying a donut or fried snacks, but making them at home tends to leave me a bit uneasy as I’ve got a bit of a fear of cooking things in a big bubbling vat of oil. But in a year that has made doing many things impossible, I felt it was right to give them a go. I also made sure I had suitable fire safety equipment in my kitchen, so I felt a bit happier with the big sizzling pan knowing that I was probably not going to set fire to the house (spoiler: the house is still fine).

While they look complex, they are actually quite easy to make if you have the equipment and enough time. But this is not a recipe to make when you have pets or small children running around!  The mixture is similar to pancake batter, so takes just a few minutes to mix up. You then heat the rosette iron in the oil, then when it is very hot, you dip it carefully into the batter. A thin layer of the batter will cook on impact, and then when you put the iron back into the oil, the cookie will release itself from the iron and fry to a golden colour.

I learned from experience that you need to let the rosette iron get very hot in the oil before you start. My first two attempts were really bad – the iron was not hot, so the dough did not stick, and they were a complete mess. It was just trial and error that helped me work out how to do it properly. Apart from that, the only advice I can offer is to make sure you have lots of kitchen paper on plates to drain excess oil from the cookies, and to make sure you’re able to open lots of doors and windows so your house does not enjoy the lingering aroma of cooking oil! Once you’ve got the knack, you’ll be able to turn out plate after plate of these little guys.


With the frying part done, I finished my struvor off in a few different ways. Some were dusted with icing sugar, and they were delicious. I dipped some others in cinnamon sugar and a few I finished off with sugar and ground cardamom. All tasted good, but my favourite (and the one recommended by Johanna) was the cardamom. It is a fresh, citrussy flavour that brings a bit of zing to these cold dark days.

So, how are they? Really, really great. They’re crisp, sweet and really feel very festive. They’re certainly not something you would eat every day, but that’s pretty much the point isn’t it? They transported me to a Christmas market where some sort of sweet, fried delight is de rigueur.

Struvor are best made fresh, but if you struggle to eat them all in one sitting (which is easy as even a small batch can easily run to 30…) you can store them if you don’t put sugar on them right away. Put them in an airtight container and pop them in the freezer, then revive them in a warm oven when you’re ready to eat them. While they’re not quite as good as when freshly made, they will regain their crispness and a sprinkling of sugar will revive their charm.

To make Struvor (makes around 30), based on the recipe on Kokblog

For the batter

• 150ml whole milk
• 1 tablespoon cream
• 1 egg
• pinch of salt
• 2 tablespoons lager
• 90g plain flour
• 300ml vegetable oil, to fry

To finish

• icing sugar, cardamom sugar or cinnamon sugar

1. Prepare your work area. Layer several sheets of kitchen roll on a couple of large baking sheets.

2. Make the batter. In a large bowl, beat the egg. Add the milk, cream, salt and lager and. Finally add the flour and salt and mix until smooth. Leave for 10 minutes to rest.

3. Get your sugar ready. Mix caster sugar with spices of your choice, and spread out on a plate. If using icing sugar, put some into a small sieve and keep close at hand.

4. Time to fry! Put the oil into a saucepan, and heat to 180°C. When up to temperature, dip the rosette iron into the oil to heat it – you want it to be good and hot, so leave for at least 30 seconds. Take the iron out, and dip just the bottom part of the iron into the batter (be careful that it does not come all the way up and cover the iron, or the cookies will not form).

5. Put the iron back into the oil, and submerge the batter in the oil. The cookie should start to peel off like magic, but you may need to give it a little helping hand with a knife.

6. Let the cookie fry for a few seconds, then turn it over and cook for another few seconds until golden. Remove the cookie from the pan, allow excess oil to drain, then transfer to the tray lined with kitchen roll. Allow to cool for a moment.

7. If using cardamom or cinnamon sugar: press one side of the still-warm cookie into the sugar, then leave to one side to cool completely. Now start with the next cookie…

8. If using icing sugar: when you’ve cookies all your cookies, dredge liberally with icing sugar.

Leave a comment

Filed under Christmas, Recipe, Sweet Things, Uncategorized

{9} Kürbiskernkipferl

You missed me? I normally try to get all my festive baking done before Christmas day so that I can then relax and enjoy my bounty over the holidays. However this year was busy (plus I started late!) and I figured that it made sense to take a little break rather than rushing to complete everything by a self-imposed deadline. Was it the right thing to do? Of course! Less stress for me in the kitchen, and now I’m feeling a renewed sense of enthusiasm after my mini-hiatus.

So here is the final tranche of festive recipes. Today we have Kipferl. These are traditional shortbread cookies that appear across Germany, Austria and Hungary (plus other countries – borders and culinary traditions rarely match easily). They are shaped into crescents, baked and then, while still warm, coated in vanilla-flavoured icing sugar.

Kipferl are traditionally made with ground walnuts, but other flavours also work well. I’ve made these before with cardamom and pistachio, but this year I decided to add a twist by using a quintessentially Austrian ingredient – these cookies are Kürbiskernkipferl, or pumpkin seed crescents. Green pumpkin seeds are used in Austrian cooking and baking, sprinkled on breads and salads, and most famously, turned into oil.


Pumpkin oil is a speciality of the southern Austrian region of Styria. I’ve been on holiday there, and seen fields and fields of the things. I assumed they were grown for their flesh, but no – the prize is those seeds. They are pressed to extract their oil, which is deep green and has a delicious nutty flavour. Indeed, it is so valued that it is referred to as “green gold”.

I’ve also been warned by two separate Austrians that if you are travelling by plane with the stuff, you need to keep it in your hand luggage, and then open it mid-flight to release a build-up of pressure, otherwise the container with shatter and ensure that everything nearby is coated with a deep green oily stain that can never be removed.

Thankfully, you can also buy pumpkin oil it in delicatessens. And if you see it, buy it! It is wonderful in dips, and drizzled on salads, risotto or even ice cream.


You might be looking at the pictures and wondering whether these cookies really are that green? I thought the same thing. I assumed other bakers had added green food colouring to get the bright shade. This assumption appeared to be validated when I ground down some pumpkin seeds, as the mixture looked rather grey. Even when the dough the colour was still rather muted. But during baking, I was proved wrong. The colour appeared and I can only assume that the oil is released and that is what gives you this pretty shade of green.

One important thing to know when making this recipe is that the dough will seem quite dry. This is because I have added cornflour to help the cookie keep their shape and to give them a crumbly texture once baked. For this reason, when shaping the cookies you just need to form the dough into balls and then press them into a crescent shape with your fingers. The traditional way to do it is the roll the dough out between your hands and form a horseshoe shape, but this dough is too fragile for that. Just make sure you avoid adding any water to the dough – it will completely change the consistency and they won’t bake properly.

Once you have shaped, baked and witnessed the miraculous colour change, you need to finish your Kipferl. Traditionally this is by dipping them in vanilla-perfumed icing sugar. In fact, you want to dip them twice. The first time when they are warm, which means that the butter in the cookies mingles with some of the icing sugar to form a sweet coating. Once they are cool and you are ready to serve them, roll them again briefly so they look snowy-white and pristine. This is also a good way to disguise any cracked cookies, so if they come out of the oven and look less than perfect, icing sugar is going to cover it all up.

However, there is also an alternative. Show off that green colour by just dipping the ends into dark chocolate. They taste great, look pretty and have more than a passing resemblance to Swedish cakes that look like vacuum cleaners (really!).

To make Kürbiskernkipferl (makes around 20):

For the dough

• 60g pumpkin seeds
• 100g plain flour
• 25g cornflour
• 80g butter
• 50g white caster sugar
• 1/2 teaspoon vanilla extract
• generous pinch of salt
• 1 egg yolk

To finish

• icing sugar or dark chocolate

1. Put the pumpkin seeds into a food processor and grind to a fine powder. Mix with the flour and cornflour, and set aside.

2. In a large bowl, cream the butter, sugar, vanilla and salt until smooth. Mix in the egg yolk, then fold in the flour/pumpkin seed mixture. Mix to form a dough. It should be firm and seem quite dry. Wrap in cling film and chill for an hour in the fridge.

3. Preheat the oven to 175°C (345°F) and line a baking sheet with greaseproof paper.

4. Remove the dough from the fridge. Divide into 20 pieces – each is around 15g – and roll briefly into a ball. Place on the baking sheet, then use your fingers to form into a crescent shape.

5. Bake the crescents for around 15 minutes until lightly golden (turn the tray around half-way to get an even colour and bake).

If coating in icing sugar…

6. Put icing sugar into a wide bowl.

7. Remove the cookies from the own. Allow to cool for a moment, then transfer a few of the hot cookies at into the icing sugar, ensuring each is completely covered. Remove when coated, then leave on a wire rack to cool completely. Keep going until all cookies are covered in sugar.

8. Re-dip the cookies in icing sugar just before serving.

If dipping in chocolate…

9. Let the cookies cool completely.

10. Melt and temper your chocolate (BBC Good Food will explain all).

11. Dip one end of a cookie in chocolate, allow the excess to drip off, then dip the other. Transfer to a baking sheet. Repeat until all cookies are done. Leave to set.

Leave a comment

Filed under Christmas, Recipe, Sweet Things

{8} Benne Wafers

Today’s recipe contains none of our traditional festive flavours. Meet the benne wafer: very thin, very crisp cookies that are caramelised and buttery, and flavoured with toasted sesame seeds. They’re utterly delicious, they hail from the American South and they have been presented in recent years as a great addition to the holiday cookie platter.

I’m always keen to find new recipes and I’ve said before that the USA is under-represented in my festive baking exploits. So I was keen to find out a bit more.


Benne wafers are from the city of Charleston in South Carolina, and they get their name from the word for sesame (bĕne) in the Malinke language spoken across parts of West Africa. When I started to research recipes for this year’s baking, I was initially excited to find an American recipe that goes back in time as this is quite the contrast to elaborately-iced sugar cookies.

However, it was really obvious really fast that recipes talking about “colonial times” and “African influences” were employing euphemisms. Benne was brought to South Carolina by enslaved people. This was upsetting, especially when I found out that the culture of those enslaved people saw benne seeds as being a source of good fortune, and for this reason they would grow them where they could. But I also found something hopeful in the fact that the original name has endured and become part of the culture of modern Charleston, rather than just being squeezed out by the English term as could so easily have happened. They are benne wafers, not sesame crackers. You might think that this is rather heavy commentary for a baking blog, but it simply did not feel right to skip over this point.

I also reflected on what this means for the history of the recipes that we make today, and in many cases hold dear to our collective consciousness. The history of food is the history of the world. This made me want to learn more about how the food we eat today has been influenced by our joint history – the good, the bad and the ugly. I sense some some heavy reading on my Christmas reading list this year, but I am confident that it is going to be illuminating and thought-provoking.


But to the baking. Unlike many of the recipes I have made this year, benne wafers are some of the easiest that I have tried. You just mix up the batter, spread on a baking sheet, then bake. No waiting, no chilling. And for your work you are rewarded by truly delicious, thin, crisp cookies. I happen to think that they are a very attractive shade of golden caramel with the pale sesame seeds peeping out. If you want to make them look a little more fancy-fancy, add a couple of spoons of black sesame seeds to the mixture to provide a bit of contrast.

Indeed, I would go so as to say that these might be the best cookies that you’re not making. They certainly give you a lot of reward for comparatively little effort. They also do not contain most of the traditional holiday flavours – no spice, no citrus, no fruit, no chocolate – so they offer a different flavour profile which I am confident will fly off the serving platter when (if?) we have friends round to our houses again…

Having said benne wafers are easy, there is one tip I want to share: bake a test cookie before you start with whole trays. Ovens can be fickle, and you want to work out how dark you want the cookies to be. They are delicious if lightly golden, and they are delicious is a deep caramel colour. It’s a matter of personal preference, but you do want to make sure you don’t over-bake as their thin, sugary nature makes them easy to burn too. Just a little tip to make life easier!

So there you have it – a cookie with a bit of history. But benne wafers are not unique in this regard. It doesn’t take too much to imagine what is behind the sugar and exotic spices that are much used in many traditional European festive bakes. This doesn’t mean that I will stop making these recipes, but it cannot be a bad thing to learn more about the history around them.

To make Benne Wafers (makes around 50)

• 150g sesame seeds
• 300g soft brown sugar

• 185g butter
• 1 medium egg
• 125g plain flour
• 1/2 teaspoon salt, finely ground
• 1/4 teaspoon baking powder
• 1/4 teaspoon vanilla extract

1. Preheat the oven to 190°C (375°F). Line a baking sheet with greaseproof paper.

2. Put the sesame seeds into a large frying pan. Cook over a medium heat for a few minutes, stirring constantly, until light golden brown. Watch them very carefully as they can burn very quickly. When done, pour onto a plate and leave to cool (they will keep cooking and burn if you leave them in the pan).

3. Put the butter in a large bowl, and beat until soft and creamy. Add the sugar and mix well. Add the egg and vanilla, and beat until it is smooth and well-combined.

4. Mix the flour, baking powder and salt, then fold into the main bowl. Finally, add the toasted sesame seeds and mix well.

5. Take half-teaspoons of the mixture and place on the baking sheet, leaving at least 5cm (2 inches) between each – I put 12 on each tray. Slightly moisten your fingers with cold water, then press the dough into flat discs about 1/2 cm (1/4 inch) thickness. You don’t need to be precise about this.

6. Bake the cookie for 6-7 minute, turning half-way to get an even colour. Remove from the oven, and allow to cool for a few minutes before transferring to a cooling rack. Note: store the cookies in an airtight container otherwise they will absorb moisture in the air and turn soft.

2 Comments

Filed under Christmas, Recipe, Sweet Things

{7} Hausfreunde

It is nearly Christmas, so we really need to have something with chocolate. On today’s cookie platter we have Hausfreunde, which are little German cookies made of shortbread, filled with apricot jam and marzipan, and topped with dark chocolate and walnuts.


I also find the name to be is utterly charming. Or I did. I translated it as “friend of the house” or “family friend”, but thought it might be good to double-check in case my German is rusty. According to the website of the Langenscheidt dictionary (which I spent hours leafing through in paper form when learning German all those years ago, and hence now have no need for Google Translate) it can also mean “lover”. So I was sitting there thinking that these were adorable, and the name reflected that they are wholesome and traditional and familiar at the most magical time of the year. Certainly I found the flavour to be very traditional, if anything on the less sweet side, and that felt like a nod back to times past. But now I am left wondering if they are a nod to forbidden fruit, and a platter of these little guys is more about irresistible temptation? I may, perhaps, be over-thinking this.

They certainly look impressive, and you might think they are difficult to make. Certainly there are a number of steps, but each is individually fairly easy and the recipe lends itself to being made over a couple of days.

But, of course, I did decide to make life a little harder than it has to be. This is mainly because in London we’re kind of not really going anywhere indoors at the moment, and I’ve had my fill of multiple trips to the local funfair in the freezing cold. Yes, once again socialising means lots of standing outside in the cold, or being harassed to hold yet another online game of bingo for a bunch of 6 year olds on Zoom. You can see why pottering (hiding?) in the kitchen is so appealing.

So what did I do? It was the marzipan. I could have used the perfectly good and high-quality marzipan I already had in the baking cupboard. But no, I decided to have a go at making it myself. I’d already done it with my Goan Marzipan sweets, so when on a roll keep rolling.

For these cookies, I used this recipe from Anna Olsen, and it is pretty straightforward. You make a syrup of white sugar and acacia honey, then pour the hot mixture onto almonds and mix it well. The flavour is good, so it is nice to know that it is very easy if you want to make marzipan with other nuts: pistachio, hazelnut and walnut are all options to explore. I get the creeping feeling we’ll get a lot of time to practice things in the kitchen come the new year…


The flavour of these cookies really is excellent. The combination of shortbread, apricot, marzipan and chocolate really is a winner. They have that “central European Christmas” flavour vibe and I’m here for it. I started out wondering whether such a labour of love was worth the effort, but I was pleased to discover that it was. They are surprisingly not particularly sweet and seem all the more sophisticated for it.

Now, are there any tips I can share with avid bakers keen to embark on a grand project? Really, it is just about the chocolate. It is best if you temper the chocolate so that it looks shiny and has a pleasing crack when you bite into the cookies. The easiest way I have found is to put chocolate in a bowl, and microwave for 30 seconds. Stir. Another 30 seconds. Stir. Another 30 seconds. Now the chocolate should be starting to melt. Now microwave in 10 second bursts, stirring after each. The key is you want to just melt it but to keep the temperature as low as possible. Basically chocolate in bars has been tempered, and it will return to that state if you melt it only slightly. But if you’re keen to get more scientific, then BBC Good Food will explain all!

Speaking of chocolate, I’ve suggested melting 300g (about two bars) of dark chocolate for dipping. This seems (and is) a lot, and you won’t use anywhere near all of it. But it makes it much easier for the dipping stage. Once I’m done, I just spread it onto a sheet of greaseproof paper and let it set. Then just break it up and use it in another recipe (unless someone else in the house finds it first and eats it).

So, Liebe Leute – we’ve passed the half-way mark in the 2021 edition of the Twelve Bakes of Christmas. I hope you’re enjoying them, and that they may even have provided a little inspiration. And I promise there is more chocolate to come!

To make Hausfreunde (makes 24)

For the dough

• 225g flour
• 25g cornflour
• 75g icing sugar
• 165g butter
• zest of 1/2 lemon

• 1 1/2 teaspoons vanilla extraxt
• 1 medium egg, beaten

For the marzipan

• 125g ground almonds
• 1/2 teaspoon almond extract
• 100g caster sugar
• 45g acacia honey
• 1 tablespoon water

To assemble

• 200g apricot jam

To finish

• 300g dark chocolate
• 24 walnut halves, lightly toasted

Make the cookies

1. Put the flour, cornflour and icing sugar in a bowl. Mix well and set aside.

2. In another large bowl, beat the butter until light and fluffy. Stir in the lemon zest and vanilla. Add in the dry ingredients. Stir in the beaten egg until you have a soft dough – if it is sticky add a little more flour.

3. Wrap the dough and chill for an hour, or overnight.

4. Time to bake. Preheat the oven to 180°C (355°F) and line a baking sheet with greaseproof paper.

5. Roll the dough out to around 1/2 cm (1/4 inch) and cut out circles (5m diameter). Keep going until you have 48 discs. You will need to bake them in batches.

6. Transfer the cookies the baking sheet. Bake for around 10-12 minutes, turning half-way for an even colour. The cookies should be lightly golden when done. Leave to cool.

Make the marzipan

7. In a heatproof bowl, mix the ground almonds and almond extract.

8. Put the sugar, honey and water into a pan, and heat until the sugar dissolves. As soon as it comes to a rolling boil, pour the syrup onto the almonds and work to a paste with a silicone spatula. When smooth, wrap in greaseproof paper and leave to cool at room temperature.

Assemble the cookies.

9. Match the cookies in pairs by size (there is always some variation in size no matter how careful you are).

10. Warm the jam in a saucepan. Sieve if you want (you don’t have to), then add a teaspoon of apricot jam to each base (keep some jam back for the tops of the cookies). Gently place the partner cookie on top, and leave for a moment so the jam can set.

11. Marzipan time! Knead your marzipan (if it is very stiff, you can add a few drops of water to soften it). Sprinkle a worktop with icing sugar, and roll the marzipan out to around 4mm. Cut out marzipan circles using the same cutter as you did for the cookies (5cm diameter). Brush the top of each cookie with the remaining jam, then place a disc of marzipan on top. Press down gently.

Time to dip in chocolate!

12. Melt and temper your chocolate (BBC Good Food will explain all).

13. Dip the top of each cookie into the chocolate so that the marzipan is covered, but the sides of the cookies are left exposed. Let any excess drip off, then flip back the right way up. Immediately place a walnut half on top of the cookie. Repeat until all cookies are done. Leave to set.

1 Comment

Filed under Christmas, Recipe, Sweet Things, Uncategorized

{6} Zázvorníky (Slovak Ginger Cookies)

Last year I had great success with walnut cookies from Slovakia that looked like walnuts. So I was naturally delighted to find another Slovakian recipe, this time for ginger cookies. And guess what? They’re shaped to look like root ginger. Pretty clever, yes?


I loved the look of these cookies as they combine three things I really like in baking – an interesting shape, lots of warming ginger, and I get to use baker’s ammonia (aka my favourite novelty raising agent). Fun times!

Baker’s ammonia is an uncommon ingredient today, but is has a long history that pre-dates baking powder (indeed, baking powder was invented only as recently as 1843 by Alfred Bird when he was looking for a leavener that was both egg and yeast-free). Baker’s ammonia was originally derived from the ground-up antlers of red deer, hence its other name “salt of hartshorn”, but it is now made chemically.

In its pure state, it has a really pungent smell of ammonia and you can’t eat it, but the benefit of baker’s ammonia is that it gives cookies great lift and crispness as it breaks down completely during baking to create gas. This does mean when you open the oven door you are treated to a really pungent waft of ammonia. The cookies themselves are completely ammonia-free, but it is important that anything you make with baker’s ammonia is fairly thin so that they can expand and that stinky gas can escape. For this reason it is not used as a raising agent in cakes. And be warned – you can’t try the cookie dough that has baker’s ammonia in it!

You can see in the picture below what effect baker’s ammonia has. The cookies will double or triple in height during baking creating a lightness that baking powder can’t beat.


You might look at this recipe and wonder if two tablespoons of ginger is really right? Yes it is. The flavour is ginger, and only ginger (with the addition of a dash of vanilla, which the Flavour Thesaurus tells me is a good pairing). So if you’re making a cookie which is all about ginger, then you really want to make sure that there is enough in there to really pack a punch. After baking the flavour really is delicious – they’re fairly sweet, but after a moment the warmth of the ginger tempers that. Heck, you might even want to add a third tablespoon of ginger is you want them really fiery. And if you wanted to make them even more special, dipping the bases into dark chocolate would be fabulous, as you’ll have the awesome ginger-chocolate combination along with the crunchy biscuit.

There is also a special cutter for making zázvorníky. I’ve seen people describe it as looking like a piece of ginger root, and that is enough for me. If walnut cookies are shaped like walnuts, it is just a matter of logic that ginger cookies should look like ginger. But it does feel like we are starting to veer into Doctor Seuss territory where cookies must only ever be shaped like the thing they are flavoured with.


Sadly, I could not find a zázvorníky cutter anywhere, so I had to improvise. I had three options. First, I could have gone online and ordered a bespoke cookie cutter based on my design which would be 3D printed. This was my original plan, but I’ve been warned on more than one occasion that I have too much kitchen equipment already. Second, you could just freestyle them with a knife and perhaps a paper template, which I think could be very meditative but would also take a bucket load of patience.

Which brings me to the third option: I improvised by cutting the rolled dough into rectangles (2x8cm), then I used a large round piping nozzle to cut half-circles along the sides. This proved to be really easy and effective, plus I got a bit of credit for not buying another single-use item. Win-win!

These cookies need to rest overnight, and in the morning you get to bake them with the joy of your kitchen already being clean. The drying is essential – it means they keep their shape, and the lift from the ammonia is directed down so that the gain a lot of height. As a result, I think they do sort of look like ginger rhizomes after baking. What do you think?

I really enjoyed these. They’re fairly easy to make, and the shape is unique and fun, and they really taste great. A clear yes from me.

To make Zázvorníky (makes 50)

• 250g plain flour, plus 50-75g extra as needed
• 2 tablespoons ground ginger
• 1/2 teaspoons baker’s ammonia
• pinch of salt
• 250g icing sugar
• 2 large eggs, at room temperature
• 4 tablespoons melted butter, cooled
• 1/4 teaspoon vanilla extract

1. Put 250g flour, ginger, baking ammonia and salt into a bowl. Mix well and set aside.

2. In a separate bowl, add the eggs and icing sugar. Beat with an electric whisk until pale and fluffy, around 5 minutes. The mixture is done when a lifted beater leaves a “ribbon” on the mixture.

3. Add the cooled melted butter (and vanilla if using) and fold gently. Finally, add the flour mixture and mix well until if forms a firm dough. You may need to add more plain flour – add 25g at a time until you have a firm dough. I added an extra 50g in total.

4. Roll out the dough to about 1/2 cm thickness. Cut out whatever shapes take your fancy, and transfer to a baking sheet. You can make different shapes, but try to keep the same sizes on each sheet so that they bake evenly. I cut rectangles of 2×8 cm, then used a large piping nozzle to cut semi-circles along the edges.

5. Leave the cookies to rest, uncovered, overnight so that the tops dry out.

6. The next day, preheat the oven to 170°C (340°F). Bake the cookies for 10-12 minutes. They are done when they are puffed up and lightly golden. Remove from the oven and allow to cool.

Note – store in an airtight container. Cookies made with baker’s ammonia can soften over time, but you can restore their crunch by putting them in a low oven for a few minutes to dry them out a little.

Leave a comment

Filed under Christmas, Recipe, Sweet Things

{5} Muskazinen

Today’s festive item is a regional German cookie associated with the town of Dettelbach in northwestern Bavaria. And they come with a delightfully whimsical origin story. Back when Dettelbach was a hotspot on the pilgrim trail, a local baker called Urban Degen sought to capitalise on all that passing trade. He created a spiced sweet, and derived the name from the German word for nutmeg (Muskat). Apparently Herr Degen was rather vain, and felt himself to be the best-dressed baker in town. As a tribute to himself, he shaped his sweets into the form of a bow tie.

The cookies themselves are fairly dry and crunchy, which is often the case with traditional bakes that needed to keep for extended periods. They are heavily spiced, with a lot of nutmeg.  Various different versions do exist, with a number of bakers in the town of Dettelbach selling versions based on their own secret recipes. I have used a recipe from the excellent site of Milk and Hanni which includes spices, walnuts and candied peel. I absolutely love them – spiced, fruity, crunchy and a really interesting bake with gives you the sense of something with a bit of history to it. They also keep very well in an airtight jar, so good to have on hand for your morning coffee or tea in the afternoon.

I have to confess when I first came across these, the shape did not scream “bow tie” to me. I thought they looked more like bunches of wheat which had been bound in the middle.  I did hunt high and low for the right mould, but the only one I could find was on Etsy and had been sold some time ago. My search for an exact match was otherwise fruitless. Either this is the must-have kitchen accessory for 2021, or they are just really hard to track down.

But fear ye not – I was able to buy a wooden shell mould which did the trick just as well. If you want to have a go and are struggling, a madeleine pan may work, or you an just form shapes freehand. They will taste as good, and it can be a good creative outlet on dark evenings.


The dough is really easy to make, with the art being in making the shapes. There is no fat in the recipe, so the dough is rather sticky. I tried using flour and icing sugar in the mould, but the cookies kept getting stuck (meaning I had to clean the mould, which delayed proceedings). It turns out the easy fix was to roll a ball of dough, put it on the tray, cover in cling film, then press the mould on top. Just like that – perfect little scallop shapes! They might not be bow ties, but I still think they look adorable.

One of the features of muskaziner is that when they bake, they puff up and develop “feet” similar to macarons. After shaping, it is essential to leave the surface to dry out (in this case, overnight) so that in the oven, all the lift in the cookie is directed downwards. It is a similar approach to making highly decorated German Springerle or  Swiss Chräbeli.

To make Muskazinen (makes around 60 cookies), recipe by Milk and Hanni

• 250g plain flour
• 1 1/2 teaspoons baking powder
• 75g finely chopped walnuts
• 1 teaspoon ground nutmeg
• 1/4 teaspoon ground mace
• 1/4 teaspoon ground cloves
• 2 teaspoons mixed spice 
• 1 1/2 teaspoons cinnamon
• 40g candied citrus peel
• 2 medium eggs
• 200g white caster sugar

1. Mix the flour and baking power. Set to one side.

2. Finely chop the walnuts, and then the candied peel. Put in a bowl with the spices and mix well. Set aside.

3. Put the eggs and sugar into a large bowl. Beat for at least 5 minutes until the sugar has dissolved and the mixture is pale and fluffy.

4. Add the nut-spice mixture and stir. Fold in the flour to form a dough.

5. Pinch off portions of the mixture and shape (freehand or using a mould). Place on sheets of greaseproof paper.

6. Leave the sheets of cookies to dry at room temperature overnight.

7. To bake, pre-heat the oven to 200°C (390°F). Bake the cookies for around 8 minutes until risen and lightly browned.

1 Comment

Filed under Christmas, Recipe, Sweet Things, Uncategorized

{4} Goan Marzipan

I love a bit of marzipan. So can you imagine just how excited I got when I found that there is a tradition of making Christmas marzipan in the Indian coastal city of Goa? Than answer is very. And it is not just marzipan, but marzipan that is brightly coloured and fashioned into intricate shapes to create a truly dazzling display for all the senses.


The tradition of making marzipan came to Goa with the Portuguese. Over time it has been adapted by replacing imported almonds with the local cashew nuts which grow plentifully around Goa. If you prefer, you could use almonds. Indeed, I saw lots of people using them, but I really wanted to have a go with the cashew nuts.

The overall flavour is really pleasant – the texture was very smooth as I had blitzed the nuts to a powder using a spice grinder. The rose flavour is noticeable but still subtle, with the almond extract very much playing second fiddle. This addition of rose is apparently a hallmark of Goan Marzipan, so I think you would want to make sure that you include that, regardless of the nuts that you use. Just be sure that you’re not over-doing it. I used rose water, so a tablespoon was right. If you’re using the more concentrated rose extract, then be careful to use just a few drops as you can easily go from lightly perfumed to overpowering in a moment.


This recipe uses egg whites, and is a cooked marzipan – helpful if you’re nervous about uncooked eggs in a recipe. You essentially mix everything up, then cook it on a very, very gentle heat in a non-stick pan. The mixture starts off looking dry, and initially appears to melt as the sugar dissolves into the egg white and rose water, then as it cooks it will start to firm up. It only takes 10-15 minutes, but you really do need to watch it carefully, all the while stirring with a silicone spatula to cook it evenly and prevent any burning. This is the time to put on music or a radio play, and enjoy a mindful moment when you’re not being disturbed.

I must, however, sound a word of caution. I actually ended up making this twice. I tried one approach involving soaking the nuts, and then grinding them down to a paste. I think somehow too much water got into my mixture, because after a long cooking time the marzipan was still too moist and soft to set. I remedied that by adding a lot of extra icing sugar, and while that did work it meant the marzipan was very sweet. I noticed that lots of recipes caution not to add any extra water when making marzipan, and I think this is why. But hey, it means you can learn from my mistake. I tried this a second time with unsoaked ground cashew nuts, icing sugar, egg white and flavourings. It ended up being much easier and quicker and yielded a great result. It also meant that the mixture was 1:1 of nuts and sugar, so it is sweet but not sickly.


Of course, the really fun bit was shaping the marzipan. I used silicone moulds, which worked really well. I made a selection of abstract shapes and flowers in muted tones of pale green, pink and yellow. Pretty classy. It is also fun to take bits of different colours, roll them into balls, then press them into moulds to get a marbled effect. If you don’t have moulds, you can simply roll it out an cut small shapes. If you’ve got something with texture, you can also use this to emboss the top of the marzipan. Indeed, get playful – place cling film on top, and press down things like star anise or pasta shapes for some really interesting effects.

After the tasteful marzipan shapes, it was time to get fruity. Literally. This turned into a riot of bright colours and whimsy. Again, I used moulds for this. I left the marzipan uncoloured , and then decorated them freestyle with a paintbrush and food colours. Overall I’m happy with how they turned out. If you prefer to colour the marzipan first, that will work too. But again, you do not need to use moulds and can make very effective marzipan fruits by shaping them by hand and letting your creativity run riot.


Finally, in addition to various tropical fruits, I could not resist making a few little marzipan potatoes. These are really common in Germany, and have the benefit of being incredibly easy to prepare. You don’t need moulds and they look really convincing. Just form pieces of marzipan into irregular rounded oblong shapes, poke some holes to represent the eyes, then roll or dust in a little cocoa power. They really do look like miniature potatoes and are always a hit with kids!

To make Goan Marzipan (makes around 50 pieces)

• 200g cashew nuts
• 200g icing sugar
• 1 tablespoon rose water
• 1/2 teaspoon almond extract
• 1 medium egg white
• food colours, to decorate

1. Grind the cashew nuts with the icing sugar until you have a fine, smooth powder.

2. Put the egg white in a bowl and beat until frothy. Add the rose water and almond extract and mix well. Finally, fold in the cashew/icing sugar mixture and stir. It will seem very dry.

3. Transfer the mixture to a heavy-bottomed non-stick frying pan. Cook over a low heat for around 10-15 minutes until the mixture is smooth and thick, stirring and moving the mixture constantly with a silicone spatula. When you first start cooking, it will become more liquid and smooth; it will get firmer with cooking. It is ready when a small piece dropped into cold water forms a firm ball.

4. Put the cooked marzipan onto a sheet of greaseproof paper and allow to cool until it can be handled. While still warm, divide the marzipan into 3-4 balls, and use food colouring to make different colours.

5. Pinch off pieces of warm marzipan and press into moulds. Allow to set for a moment, then remove from the moulds. Place of a sheet of greaseproof paper, and allow to cool completely. Store in an airtight container.

Leave a comment

Filed under Uncategorized

{3} Mantecadas de Astorga

For the third instalment of our festive baking frenzy I decided to take things a little easier and go with a fairly straightforward recipe. These little treats are called Mantecadas de Astorga, and they are exactly what they look like – very simple but very delicious little cakes.


Truth be told, they are similar to sponge cakes or pound cake. While modern recipes suggest adding cinnamon, citrus zest of even just some vanilla, traditionally there is no additional flavouring. Does that mean they are not interesting? Well, they’re more interesting than our modern tastes might lead us to think.

A lot of Spanish baking uses olive oil or lard. Think of the similarly-named mantecados which are crumbly shortbread cookies where lard is essential to get the right texture. Seen against these other recipes, the use of butter was a differentiator. Perhaps a sign of a luxurious good when they were first created. Today we might see butter cookies are being rather plain, but there was a time when enjoying a sweet, buttery treat at Christmas would have been something quite special.

Of course, having just said all that, there are plenty of recipes for these case that use either just lard or a combination of lard and butter, but I’ve opted for the dairy-loving approach here as I don’t use lard in my baking.


These cakes hail originally from the Spanish city of Astorga in the north-west of the country near the border with Portugal. And if you are being correct, they should to be baked in little paper cases called cajillas. And to get authentic cajillas you need to take pieces of paper and carefully fold them so that when the cake is unwrapped we see the shape of a cross left on the paper. Of course I tried making them. I first gave this a go with some greaseproof paper but it didn’t work as the folds kept unravelling. The lesson: you need to use plain paper and ensure you have oodles of patience. And if you doubt the seriousness with which these paper cases are taken in the city of Astorga, there is even a mural in the old town to the ladies who specialise in making them.

While Mantecadas de Astorga are traditionally made in a small square or rectangle shape, it is not going to change the flavour if you use a round pan, but I do quite like the square shape as they look just a little touch more special. I’ve previously bought specialist square cupcake cases to use in a muffin tray with square holes, but then discovered that you can just use normal round cases, press them down, and they’ll fit the square shape. If you’re not folding your own cases, that is…


I did wonder whether these cakes would be worth making. No spice, no citrus, no chocolate, no nuts. It turns out they are really nice. Simple, but nice. Perfect with tea or coffee. Rich, buttery and sweet, but also very light. That said, they’re probably not a viable diet option (they do contain all that glorious butter after all) but they do seem light. Sort of in the way that a croissant is light, and we know we ought not to consume too many of those.


So I encourage you to try these – they’re easy to make, you probably have the ingredients already, and you get all the thrill of making your own paper cases. If you are so minded, I followed this online tutorial. It is in Spanish, but easy to follow, and after the first few you get into the knack of it. Soon you’ll be giving the mural ladies a run for their money!

To make Mantacadas de Astorga (makes 12-16, depending on size)

• 125g butter
• 125g sugar
• 3 medium eggs
• 125g self-raising flour
• granulated sugar, to finish

1. Prepare your cake cases. Either make the paper moulds by hand, or line a muffin tin with paper cases.

2. Preheat the oven to 180°C (355°F).

3. Put the butter into a bowl. Beat until very soft. Add the sugar and beat until light and fluffy. Add the eggs one at a time, beating well after each addition. Finally fold in the flour.

4. Divide the mixture between the prepared cake cases. Even it out with a spoon (it won’t be perfectly flat). Sprinkle generously with granulated sugar. Bake for 18-20 minutes until the cakes are risen and the tops are a rich golden brown.

Leave a comment

Filed under Christmas, Recipe, Sweet Things